Feature Flags
Feature flags are declared in Sentry's codebase (look for SENTRY_FEATURES in
server.py).
For self-hosted users, those flags are then configured via sentry.conf.py.
For Sentry's SaaS deployment, Flagr is used to configure flags in production.
You can find a list of features available by looking at two files:
sentry/features/permanent.py- Features typically managed by subscriptions for sentry.iosentry/features/temporary.py- Features used during development intended to be removed
They're declared on the FeatureManager like so:
# pass FeatureHandlerStrategy.REMOTE to use flagr:
manager.add("organizations:onboarding", OrganizationFeature, FeatureHandlerStrategy.REMOTE)
# pass FeatureHandlerStrategy.INTERNAL if you don't plan to use flagr:
manager.add("organizations:onboarding", OrganizationFeature, FeatureHandlerStrategy.INTERNAL)
The feature can be enabled with the following in your sentry.conf.py, usually located at ~/.sentry/:
SENTRY_FEATURES["organizations:onboarding"] = TrueYou can modify the state of feature flags in tests using a context manager.
Generally you want your feature names to be unique to help in their
removal. For example a feature flag like trends
may prove difficult to find because trends may appear throughout the codebase.
But a name like performance-trends-view is more likely to be unique and easier
to remove later
Creating a new Feature Flag
Determine what scope the feature should have
Features can be scoped by organization, and projects. If you're not confident
you want a project feature, create an organization level one. In this example
we'll build a feature called test-feature scoped at the organization level.
Determine the permanency of your feature
Typically we use feature flags for development. They are usually intended to be graduated. Feature flag that controls a subscription-based feature for sentry.io are permanent.
Most feature flags are placed in temporary.py, permanent flags live in
permanent.py.
Add your feature to server.py
conf/server.py
contains many of the default settings in the application. Here you will add
your feature, and decide what default value it should hold unless specified by
the user.
The SENTRY_FEATURES dictionary contains all the features in the application
with their corresponding scope. Your feature should start off disabled by default:
SENTRY_FEATURES = {
    'organizations:test-feature': False,
    'auth:register': True,
    # ...
    'projects:minidump': False,
}
Add your feature to the FeatureManager
If you want to back your feature flag via options
add the feature to the FeatureManager like so using the OPTIONS enum.:
default_manager.add('organizations:test-feature', OrganizationFeature, FeatureHandlerStrategy.OPTIONS)If you plan to use flagr in production
add the feature to the FeatureManager like so using the REMOTE enum.:
default_manager.add('organizations:test-feature', OrganizationFeature, FeatureHandlerStrategy.REMOTE)If you don't plan to use flagr, use FeatureHandlerStrategy.INTERNAL, for example:
default_manager.add('organizations:test-feature', OrganizationFeature, FeatureHandlerStrategy.INTERNAL)Flagr has significant latency, and is somewhat flakey. If you're working in high throughput areas like Ingest or Relay, Flagr is not fast enough or reliable enough. In these cases, you should use options instead.
Add it to the Organization Model Serializer
The Organization model serializer
(src/sentry/api/serializers/models/organization.py) builds a list
called feature_list that is given to the front-end to use. By default the all
features are checked and those that are present are added into the list. If
your feature requires additional custom logic you will have to update the
organization serializer
Using Model Flags (Less common)
Sometimes a flag on the model is used to indicate a feature flag as shown
below. This is not recommended unless there is a specific reason to make
changes to the model. For example, the require_2fa flag affects behavior on
the backend to enforce two-factor authentication.
feature_list = []

if getattr(obj.flags, 'allow_joinleave'):
    feature_list.append('open-membership')
if not getattr(obj.flags, 'disable_shared_issues'):
    feature_list.append('shared-issues')
if getattr(obj.flags, 'require_2fa'):
    feature_list.append('require-2fa')
Checking your feature
In Python code
The FeatureManager's has method checks see if the feature exists. The has
method takes in the feature's name, the object that corresponds to the scope of
the feature (i.e. an organization for an organization level feature or
a project for a project level feature), and the actor (aka user). In our case
the feature will be added like:
if features.has('organizations:test-feature', obj, actor=user):
    feature_list.append('test-feature')
which only adds the feature to the feature_list if that feature is enabled for
the organization and the type of user given. Note that when we give the feature
to the frontend, we remove the scope prefix, and
our 'organizations:test-feature' becomes 'test-feature'.
In JavaScript
There is a difference between using the flag in Sentry and in GetSentry. At this stage you're not quite ready to use your feature flag in GetSentry, but you are able to use it inside Sentry.
Declarative features with the Feature component
React uses a declarative programming paradigm. As such, we have a utility component that we use to hide components based on the feature flags available to a organization/project
import Feature from 'sentry/components/acl/feature';

const toRender = (
  <Feature features={['test-feature']}>
    <MyComponentToFlag />
  </Feature>
);
Imperative feature flag checks
There are some exceptions when React components are generated imperatively (e.g.
headers/columns for Tables). In difficult times like these, the Organization
/ Project object has a array of the feature flags, which you can use in this
way:
const {organization} = this.props;

// Method 2
organization.features.includes('test-feature'); // evals to True/False
Enabling features in development
In Sentry you can run sentry devserver to view your changes in development
mode. If you would like to view a change behind a feature flag, you will need to
open the file ~/.sentry/sentry.conf.py on your local machine. This file
contains your local settings for the sentry application, and can be viewed and
edited. If you would like to toggle a flag on or off, add this to your
configuration file:
SENTRY_FEATURES['organizations:test-feature'] = TrueWhere SENTRY_FEATURES will correspond to the SENTRY_FEATURES from step 2.
Set it to True if you'd like the feature to be available and False if not.
Flagr in development
In general, you do not need to run flagr in development to test your feature flagging. If you do want to run flagr, you'll need to be running getsentry:
- Set the environment variable:
export SENTRY_USE_FLAGR=true - Start your devservices
Your local instance of flagr can be found at localhost:18000
Enabling your feature in production
Feature flags are declared in Sentry's codebase. For self-hosted users, those
flags are then configured via sentry.conf.py. For Sentry's SaaS deployment,
you have the choice of using an option backed rollout via Options Automator,
or setting up your feature flag in Flagr.
- Options based features allow a feature to be rolled out to a specific subset of LA orgs, a percentage of EA orgs, and/or a percentage of all orgs. They don't allow the flexibility of targeting that Flagr allows. These can be used in high scale situations, and are generally preferred if you don't need the flexibility Flagr offers.
- Flagr is easy and quick to use, and is more flexible. However, it can't be used in high scale situations.
Building your options based feature
Declare your feature in sentry/features/temporary.py or sentry/features/permanent.py like so:
manager.add("organizations:your-new-flag", OrganizationFeature, FeatureHandlerStrategy.OPTIONS)This automagically registers an AutoRegisterOptionBackedRolloutFeatureHandler
for you in getsentry, and also auto registers the relevant options.
To roll out your feature, you'll want to set the rollout options via options automator. To figure out the options you need to configure, you can run the following script in getsentry:
./bin/generate_automator_feature_options.py --flag organizations:your-new-flagIt will then produce output like
Generating automator options for feature flag `organizations:your-new-flag`
Add these to the appropriate file in options automator to roll out your feature
For example, to roll out in the US, you can add them to https://github.com/getsentry/sentry-options-automator/blob/main/options/regions/us/app.yaml
To roll out to all production regions, you can add them to https://github.com/getsentry/sentry-options-automator/blob/main/options/default/app.yaml
Options:
  organizations.your-new-flag.la-rollout: 0.0
  organizations.your-new-flag.ea-rollout: 0.0
  organizations.your-new-flag.ga-rollout: 0.0
  organizations.your-new-flag.la-orgs: [
    "codecov",
    "sentry",
    "sentry-sdks",
    "sentry-test",
    "sentry-st",
    "sentry-emerging-tech",
    "specto-dev",
  ]
Open a pr in https://github.com/getsentry/sentry-options-automator to set
these options and you can roll out your feature flag. You can also customize
which orgs will be in your la rollout by modifying la-orgs
Building your feature in Flagr
If you haven't already make sure that when you add your flag in sentry, you use
the REMOTE enum. For example:
default_manager.add("organizations:onboarding", OrganizationFeature, FeatureHandlerStrategy.REMOTE) # NOQANavigate to the Flagr UI and in the input box
enter your feature name as the flag's description. Next, click the arrow on the
right of the Create New Flag button and select Create Simple Boolean
Flag. The flag's description is only used for easy finding of your flag on the
Flagr homepage, but it is the Flag Key that the API uses to find your flag.

You should then see your newly created flag in the list below, click your flag and enter your feature name as the flag key, optionally enter notes about your flag here, then click Save Flag. At this point, both your flag key and description should be your new feature. It is very important that your flag key matches exactly what is in sentry as that is what is used to look your feature up.
Each flag defaults to disabled, and your feature will not appear until you enable it, this is done via the toggle at the top right of the flag page.

In Flagr your feature needs a Variant and at least one Segment.
Variant
Variants represent the possible variations of a flag. Because flagr is
currently only used to toggle features, the only supported variant is on, and
this value is case-insensitive.
Segment
Segments represent the portions of our audience that your feature will be enabled for. Each segment can have multiple conditions all of which must be matched for a feature to be enabled.
Distribution
Represents the distribution of variants in a segment, because we'll only have one variant this value should always be 100% for each segment.
Creating a segment constraint
When creating a segment, without the distribution set, Flagr will respond as if the segment doesn't exist yet. This means that if you're creating or modifying a segment do not set the Distribution until you're ready for your feature to be enabled.
Here are the properties that are being sent to Flagr as well as the types of their values.
Each constraint requires a Property, Operator, and Value. Each segment can contain multiple constraints, all of which must be matched. A way to think about segments is that each segment is ORed together, and each constraint is ANDed together
Properties
Properties are a preset dictionary that get sent to flagr by sentry, these depend
on the organization or project being passed to features.has
| Property | Value Types | Notes/Example config |
|---|---|---|
organization_id | int | |
organization_slug | string | Example |
organization_is-early-adopter | bool | Users opt in from settings, example |
features | [string] | All active features for org |
subscription_is-free | bool | Whether the organization is on a free plan. |
subscription_is-trial-plan | bool | Whether the organization is on any of the trial plans. |
subscription_plan-family | string | Example |
subscription_plan-tier | string | Example |
subscription_channel | int | |
project_slug | string | Only passed for projects |
project_id | int | Only passed for projects |
user_id | int | |
user_email | string | The user's email address |
user_domain | string | The domain of the user's email address. |
user_is-superuser | bool | |
user_is-staff | bool | |
team_slugs | [string] | Use with an organization condition, example |
More properties can be added by updating FlagrFeatureHandler.get_context
but be considerate of the performance of additional context. Properties
cannot contain periods . as this is a special character used by flagr, in
general use an underscore _ instead.
Operators
Operators are generally straightforward, for example, == means equal. There
is the exception however of CONTAINS and IN which only operate on arrays,
This means that if you want to check that for a substring you want to use the
=~ operator.
property CONTAINS "foo"    =======> {"property": ["foo", "bar"]} -> True
                                    {"property": "foobar"}       -> False

property IN ["foo", "bar"] =======> {"property": ["foo", "bar"]} -> False
                                    {"property": "foo"}          -> True

property =~ "foo"          =======> {"property": ["foo", "bar"]} -> False
                                    {"property": "foobar"}       -> True
Values
- Values that are strings must be wrapped in double-quotes
"" - Values that are arrays must be wrapped in square brackets
[] - Values that are bools or ints should not be wrapped in quotes, for example,
trueor1
Saving
New constraints must be saved by clicking Add Constraint, existing constraints are only updated after clicking the green Save button, the Save Segment Settings button does not include constraints.
Sample Flagr Configurations
Here are some example flagr configurations for methods to release a feature to different audiences
Releasing a feature to a subset of organizations
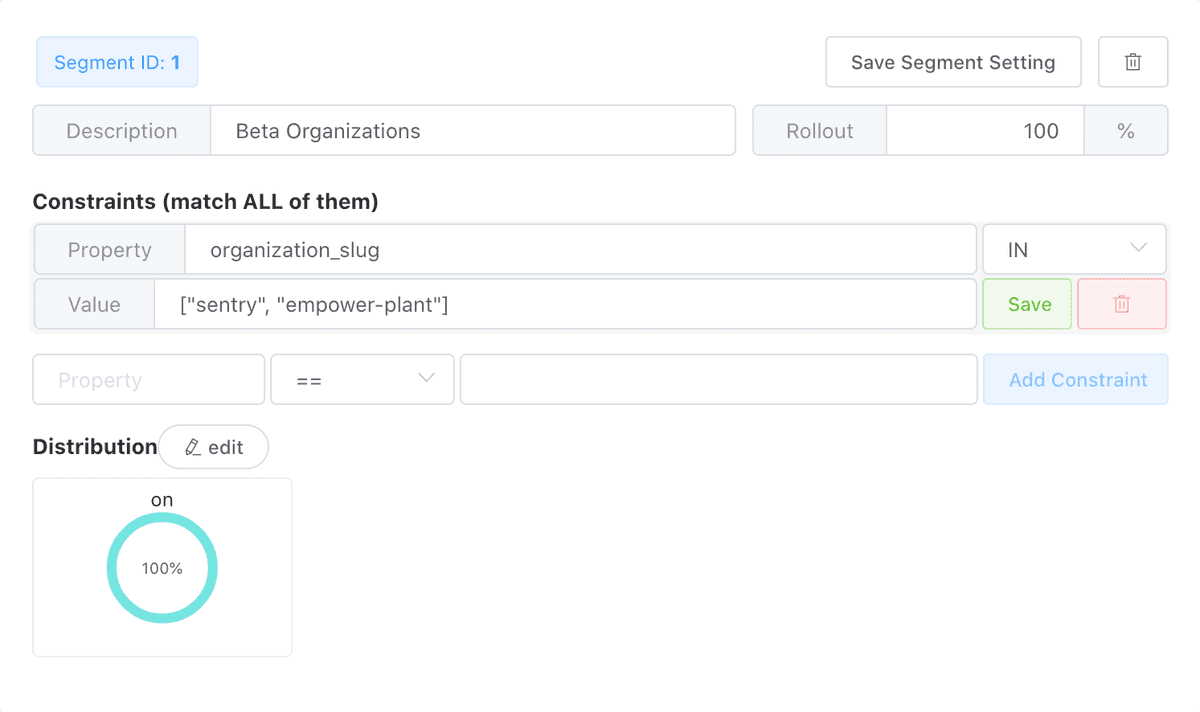
You can enable a feature for a specific list of organization slugs by setting
the condition property to organization_slug, the operator to IN, and the
value to an array of organizations, using square brackets [] for the array, and
double quotes " for each organization.

Releasing a feature to a specific team
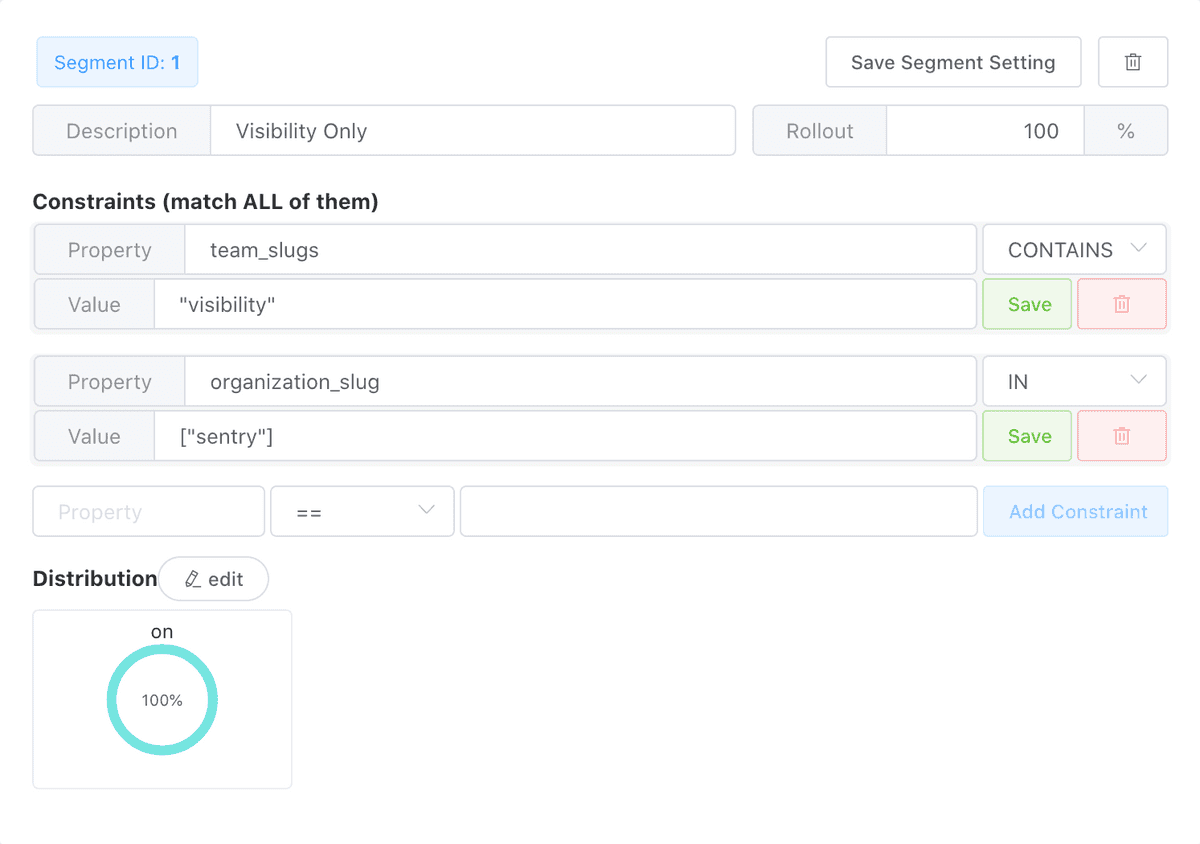
You can enable a feature for only a specific team within an organization
by setting the condition property to team_slugs, the operator to
CONTAINS, and the value to the slug of the team wrapped in double quotes ".
Also include a condition in the same segment to match organization, with either
organization_slug or organization_id. If this isn't included, any org that has the same team name will get the
feature.

Releasing a feature to Early Adopters
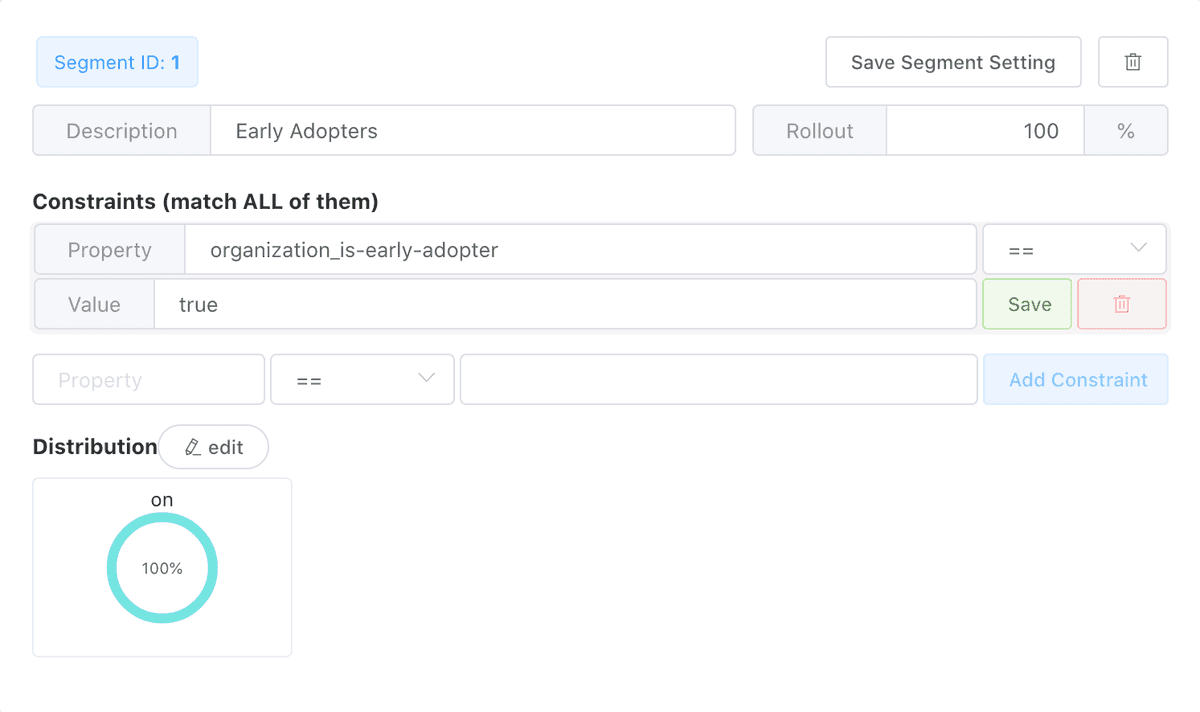
You can enable a feature to organizations that have opted in to be early
adopters. To do this set the constraint property to
organization_is-early-adopter, the operator to ==, and the value to true.

Releasing a feature to organizations with specific plans
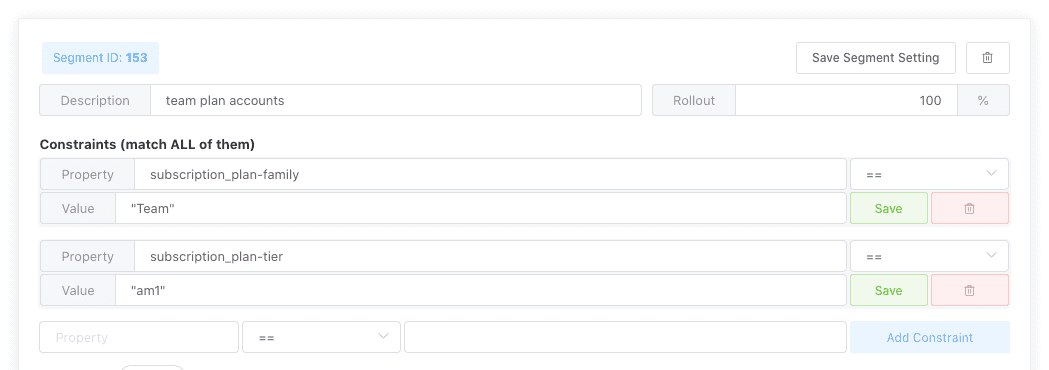
Enabling a feature for customers on specific plans can be done by creating a segment using plan properties. There are a few plan related properties you can use:
subscription_is-freeWhether or not the main account subscription is on a free plan.subscription_channelWhich billing channel an organization is on. The values of this can be found on theSubscriptionmodel.subscription_plan-familyThis is the plan family of the main subscription. One offree,teamorbusinessor None.subscription_plan-tierThis is the plan tier of the main subscription eg.am1.subscription_plan-trial-plan-familyFamily for the plan trial, if one exists.subscription_plan-trial-plan-tierTier for the plan trial, if one exists.subscription_planThis property is deprecated and should not be used in new feature flags.
Note: Some customers may have both a regular plan for their main subscription
and a plan trial. If you need to target a plan tier, (e.g., "am2" you
should create Flagr constraints for both the subscription_plan-tier property
and the subscription_plan-trial-plan-tier property.)

Releasing to organizations incrementally
When releasing a large or potentially disruptive feature you may want to enable it for a percentage of organizations incrementally. For example, on Monday it is available to 10% of users, and increasing the percentage of customers by 10% each day.
When creating your segment set the rollout rate to 0, then on each day that you increase it, enter a larger value, and click Save Segment Setting.
Note: You should not need to modify the distribution to incrementally release your feature.
After launch (Graduation)
After your feature has been mainlined and is available for all customers on sentry.io, you have a few potential paths:
- If the feature cannot be disabled, or you don't need to conditionally disable the feature, remove the feature flag and all related checks from the Sentry code base. If necessary, also remove references to the feature from the self-hosted and getsentry repositories.
- If the feature will only be available to SaaS customers on specific plans, you
need to add your feature flag to the appropriate plans and update feature
handlers (see below).You should also enable the feature by default in
conf/server.pyin sentry to ensure that the feature is available for self-hosted deployments.
Finally, if your feature was enabled through flagr, delete the feature from the Flagr UI. This is done by navigating to the flag configuration page then clicking Delete Flag at the bottom of the page.
Getsentry feature handlers
Getsentry contains a variety of feature handlers that override the
SENTRY_FEATURES map.
Plan specific features
If your feature is available for a subset of plans (eg. only on Business plans) you need to:
- Disable the feature in
getsentry/conf/settings/defaults.pyby updatingSENTRY_FEATURES. - Add your feature to the appropriate plan feature list.
- Update
SubscriptionPlanFeatureHandlerto handle your feature.
Custom handlers
If your feature requires additional logic to become active, you can also implement a feature handler in getsentry. For example, you can create a feature flag that is backed by options. follow these steps:
- Disable the feature in
getsentry/conf/settings/defaults.pyby updatingSENTRY_FEATURES. - Add a new feature handler class in
getsentry/features.pythat determines availability of the feature based on the organization or actor. - Register the handler at the bottom of
getsentry/features.py.